Setting up Role-based Access Control (RBAC) with UAA & LDAP in Ververica Platform
User Account and Authentication (UAA) from Cloud Foundry is a free, open source, and enterprise scale identity management and authorization service. Its primary role is as an OAuth2 provider, issuing tokens for client applications to use when they act on behalf of end users. Ververica Platform can be configured to authenticate against UAA thanks to its support of the OpenID Connect (OIDC) protocol. UAA can also be a bridge to other sources of truth about users and their groups, such as Lightweight Directory Access Protocol (LDAP) services. Role-based Access Control (RBAC) in Ververica Platform allows you to control the platform access based on roles that can be bound to entities such as users or groups. In this article, we walk you through the steps to set up Ververica Platform RBAC with UAA integrated with LDAP such that an authenticated user is assigned a specified role automatically based on his/her groups in LDAP.
Prerequisites
Before you continue, make sure you have the following setup in place:
-
A running LDAP server.
-
A running UAA server. If you do not have one, get UAA from GitHub and run it locally
-
A running instance of Ververica Platform Stream Edition or above. See the Ververica Platform documentation on how to get started locally with Minikube.
-
UAA CLI (UAAC), to interact with UAA. UAAC is developed in Ruby, so you will have to install Ruby first. An alternative to UAAC is to use UAA's REST API with curl.
The Big Picture
Authentication and authorization is available in Ververica Platform Stream Edition or above. Once authenticated, a user is assigned the role admin, owner, editor or viewer based on the configured role bindings, the username, and the user’s group. These roles are associated with a Ververica Platform Namespace. Different roles have different privileges in that namespace. For example, an editor has read and write access to all resources within a namespace except Deployment Targets and API Tokens.
When the authentication and authorization against UAA and LDAP is configured, Ververica Platform can assign correct roles to users as it can get usernames and groups from LDAP via UAA. Here is the big picture showing the interactions between Ververica Platform, UAA and LDAP:
.webp?width=600&height=314&name=Cluster%20Serving-%20Distributed%20Model%20Inference%20using%20Apache%20Flink%20in%20Analytics%20Zoo%20(1).webp)
-
When authentication is enabled, the Ververica Platform Web UI is password-protected. Users who try to access the Web UI are redirected to the configured OIDC provider’s (here UAA’s) login page.
-
Once UAA receives a username and a password from a user, it searches the user’s Distinguished Name (DN) in the LDAP server based on the configured mapping (explained in a later section of this article). Then it attempts an LDAP bind with the user’s DN and the provided password.
-
When the authentication succeeds, UAA retrieves the LDAP user and group information.
-
UAA encodes the user and group information into tokens which are then returned to Ververica Platform.
LDAP Users and Groups
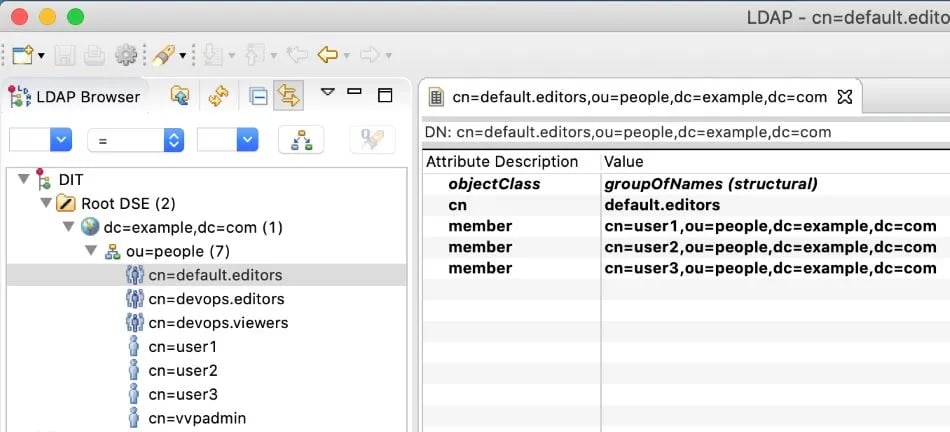
To setup authentication and authorization, users and groups have to be configured in LDAP. For demonstration purposes in this article, we are going to use the following setup:

Here we have four users: user1, user2, user3 and vvpadmin. user1, user2, and user3 are members of the group default.editors. user1 is also a member of the group devops.viewers. We use the objectClass groupOfNames to define LDAP groups. vvpadmin will be used as the administrator of Ververica Platform. The passwords of all users are password. We run our OpenLDAP server locally at ldap://localhost:389.
Integrate UAA with LDAP
To connect UAA to LDAP, append the following configuration into the UAA configuration file uaa.yml. If you started your UAA with ./gradlew run, this is ./scripts/cargo/uaa.yml. Otherwise, consult your UAA administrator for the location of the file. It should be specified by one of ${UAA_CONFIG_URL}, file:${UAA_CONFIG_FILE}, file:${UAA_CONFIG_PATH}/uaa.yml.
spring_profiles: ldap,default
ldap:
 profile:
 file: ldap/ldap-search-and-bind.xml
 base:
 url: 'ldap://localhost:389/'
 userDn: 'cn=admin,dc=example,dc=com'
 password: 'secret'
 searchBase: 'ou=people,dc=example,dc=com'
 searchFilter: 'cn={0}'
 referral: follow
 groups:
 file: 'ldap/ldap-groups-map-to-scopes.xml'
 searchBase: 'ou=people,dc=example,dc=com'
 searchSubtree: true
 groupSearchFilter: 'member={0}'
 maxSearchDepth: 10
 autoAdd: true
 attributeMappings:
 external_groups:
 - roles
 externalGroupsWhitelist:
 - '*'
In the configuration above, ldap.profile and ldap.base specify how UAA maps a username to a user DN in LDAP. The LDAP server is specified via ldap.base.url. You need to adjust the url according to your setup. ldap.groups specifies how UAA retrieves the group information for a given user DN. The configuration member={0} here is specific to the objectClass groupOfNames. If you use another objectClass to define LDAP groups, you need to adjust this accordingly. For more detailed explanations on ldap.base and ldap.groups, you can reference to the UAA and LDAP integration documentation. The purpose of attributeMappings and externalGroupsWhitelist here is to let UAA add the group informationinto the roles claim of the returned ID token.
Generate a JWS Key Pair
As Ververica Platform expects a signed JSON Web Token (JWT), we run the following command to generate a signing key:
openssl genrsa -out signing-key.pem 2048then add the content of the key into uaa.yml:
jwt:
 token:
 signing-key: |
 <content of signing-key.pem>
Use a Correct IP Address and Port
If your UAA runs remotely and binds to an IP address and a port, you can (re-)start your UAA server now. You can skip the rest of this section and substitute 192.168.64.1:18080 with your UAA IP address and port in the rest of the article.
If you run UAA locally on your computer, we need to bind UAA to an IP address which is reachable from Ververica Platform. This is because when Ververica Platform runs in a Kubernetes environment (e.g., Minikube), localhost is defined in the scope of the Ververica Platform pod, not the machine where you installed UAA. The solution here is to use the Minikube bridge IP, which is 192.168.64.1 in our case. By default, UAA binds to two ports: 8080 and 8081. If any of the ports is occupied on your computer, you need to change the UAA ports. For example, to bind UAA to 192.168.64.1:18080, change issuer.uri in uaa.yml:
issuer:
 uri: http://192.168.64.1:18080/uaa
Now, we (re-)start our local UAA:
./gradlew -Pport=18080 runUAA will then bind to 18080, and 18081.
Create a Client in UAA
Now that UAA has started, run the following commands to create a client vvp in UAA. Make sure to include roles in the scope because we will get the group information via the roles claim. Ververica Platform will use the client vvp to get tokens from UAA.
uaac target http://192.168.64.1:18080/uaa
uaac token client get admin -s adminsecret
uaac client add vvp --name VVP --secret vvpsecret \
 --scope openid,roles \
 --authorized_grant_types authorization_code,refresh_token,client_credentials,password \
 --authorities uaa.resource \
 --redirect_uri http://localhost:8080/login/oauth2/code/vvp
The password included in --authorized_grant_types above is optional. We use it only in the following verification:
uaac token owner get vvp user1 -s vvpsecret -p password
uaac context
uaac token decode <id_token from the command `uaac context`>
If authenticated correctly, we should be able to see the following roles claim in the ID token:
roles: default.editors devops.viewersIntegrate Ververica Platform with UAA
To use UAA for authentication and authorization in Ververica Platform, add the following configuration into the Helm values file values.yaml. Make sure to request the roles scope and set groupsClaim to roles in order to retrieve group information via the roles claim when a user is authenticated. Note that provider.issuerUri and endSessionEndpoint reference to the IP address and the port where UAA binds.
vvp:
 auth:
 enabled: true
 admins:
 - user:vvpadmin@example.com
 oidc:
 groupsClaim: roles
 registrationId: vvp
 registration:
  clientId: vvp
  clientSecret: vvpsecret
  redirectUriTemplate: "{baseUrl}/{action}/oauth2/code/{registrationId}"
  clientAuthenticationMethod: basic
  authorizationGrantType: authorization_code
  scope:
  - openid
  - roles
 provider:
  issuerUri: http://192.168.64.1:18080/uaa/oauth/token
  userNameAttribute: email
 endSessionEndpoint: http://192.168.64.1:18080/uaa/logout.do
Now we can start or upgrade Ververica Platform with the created values.yaml above. Do not forget to add your license into values.yaml if you are using Ververica Platform 2.1 or above before you start.
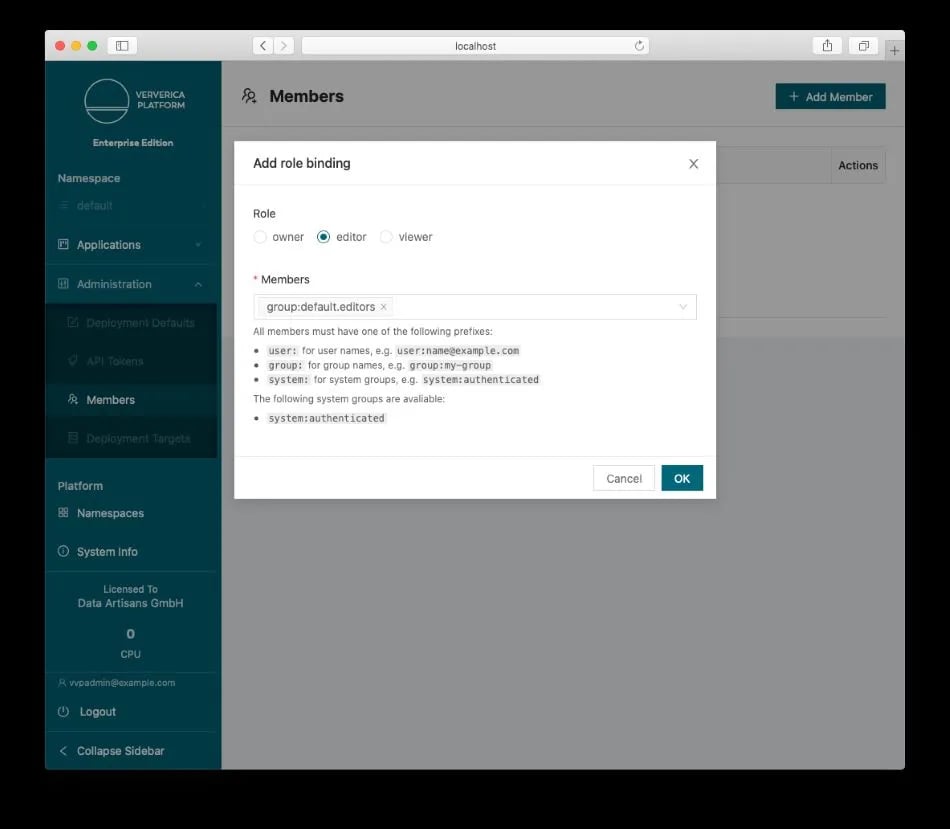
When Ververica Platform starts, it has a namespace default. In the namespace default, any authenticated user (system:authenticated) is assigned the owner role by default. We can now login to Ververica Platform as vvpadmin, remove the default role binding and add a new role binding to assign all users in the group default.editors the role editor (see the screenshot below). Open a Private Window or a Incognito Window from your browser, login to Ververica Platform with user1, you will be able to tell you have editor role in the namespace default, e.g., you can create secret values but cannot create API tokens (the menu item is grayed out).
 If you have another Ververica Platform namespace (e.g., devops), you can group your users into different LDAP groups (e.g., devops.editors, devops.viewers) and setup the role bindings in that namespace accordingly. This way, users will get their specified roles automatically once they login.
Summary
In this article, we set up the Role-based Access Control in Ververica Platform by integrating it with UAA and LDAP such that usernames and user groups are passed from LDAP to Ververica Platform via the UAA’s ID token. When the group-based role binding is set up in Ververica Platform, users are automatically assigned their roles based on their LDAP group membership once they login.
Role-based Access Control is an important feature in Ververica Platform to support Multitenancy in large enterprise environments. You can request your free Enterprise trial of Ververica Platform Stream Edition or contact our team for any questions.

You may also like

Meet the Flink Forward Program Committee: A Q&A with Lorenzo Affetti
Meet Lorenzo Affetti, a Program Committee member for Flink Forward 2025, ...

Outrun Fraudsters with Agentic AI and Ververica
Enhance fraud detection with agentic AI and Ververica's real-time stream ...

KartShoppe: Real-Time Feature Engineering With Ververica
Discover how KartShoppe leverages Ververica’s real-time feature engineeri...

Maximize Efficiency: How Ververica's BYOC Deployment Optimizes CAPEX and OPEX
Learn how Ververica's BYOC deployment leverages CAPEX and OPEX to optimiz...


