Getting Started with Ververica Platform on Microsoft Azure, part 2
It has been a while since our last blog post about how to set up Ververica Platform (vvP) on Microsoft Azure and a few things have improved since then. Time for an update and an extension on topics not covered yet. The original post covered creating an AKS cluster, getting helm and Ververica Platform (formerly data Artisans Platform) running and using Azure Blob Storage for checkpoints and savepoints. We will show how easy this setup has become with vvP 2.0 and will set up authentication with Azure Active Directory (v1.0) / Microsoft identity platform (v2.0). A future blog post will cover the integration of vvP into Azure Pipelines.
Prerequisites
Before getting started, please make sure you:
-
Have an Azure account with a valid subscription and Compute, Network, ContainerService, Storage, and Web resources enabled;
-
Download the Ververica Platform Kubernetes trial;
AKS Cluster Setup with vvP 2.0.2
First, we will spin up an AKS cluster, fetch credentials for kubectl to access RBAC (Role-based Access Control), and set up two namespaces; one for vvP itself and one for our Flink applications. Please note that creating the cluster may actually take a few minutes; hold on and wait until the commands finish.
$ az login
$ az group create --name vvp-test-group --location northeurope
$ az aks create --name vvp-k8s --resource-group vvp-test-group \
     --node-count 3 --node-vm-size Standard_D2_v3 -x
$ az aks get-credentials --resource-group vvp-test-group --name vvp-k8s
$ kubectl get nodes
$ kubectl create namespace vvp
$ kubectl create namespace vvp-target-testing
Installation via Helm
Ververica platform installations support custom configurations via a values.yaml file. Let's create one and add the details about our namespaces:
rbac: ## Additional namespaces that the created ServiceAccount can access.
 additionalNamespaces:
 - vvp-target-testing
With Helm 3.0, we do not even need a Tiller component any more but rather we simply install Ververica Platform and wait until the vvp-ververica-platform-* pod and all its containers have been started:
$ helm install vvp ververica-platform-2.0.2.tgz \    --namespace vvp \    --values values.yaml
$ helm list --namespace vvp
$ kubectl get pods --namespace vvp
Accessing the Web UI
To access the Web UI of Ververica Platform, you can create a port-forward to the service it exposes. The following command exposes the Web UI at http://localhost:8080. You can refer to the official vvP Documentation for all the different ways you can enable access to this service.
kubectl port-forward --namespace vvp service/vvp-ververica-platform 8080:80
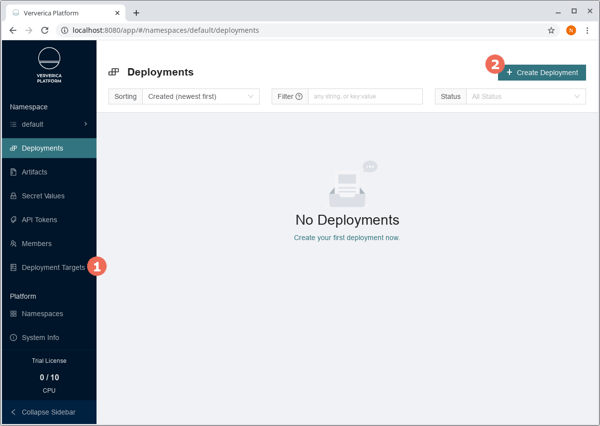
Before we can start with deploying Flink applications, we need to create a Deployment Target (1) that corresponds to our vvp-target-testing Kubernetes namespace:
-
Deployment Target Name: vvp-target-testing
-
Kubernetes Namespace: vvp-target-testing
Deploying your First Flink Application
The core concept of Ververica Platform is a Deployment, an abstraction around your application incorporating all Flink jobs throughout its whole lifecycle, i.e. after re-configurations, upgrades, etc. Create your first deployment (2) based on the TopSpeedWindowing example hosted on Maven Central:
Fill the Deployment creation form with the following values (leave the rest with the defaults):
-
Name: TopSpeedWindowing
-
Deployment Target: vvp-target-testing
-
Jar URI: https://repo1.maven.org/maven2/org/apache/flink/flink-examples-streaming_2.11/1.9.1/flink-examples-streaming_2.11-1.9.1-TopSpeedWindowing.jar
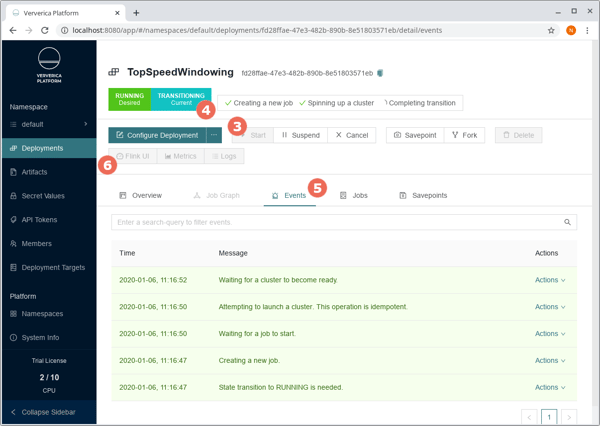
After creating the deployment, you can go ahead and start it (3). You should see the state changing to Transitioning (4) and if you click into the Events tab (5), you will see what actions vvP took to get from the previous state (CANCELLED) to the desired state (RUNNING), i.e. launching a Flink cluster with the desired configuration and job and waiting for it to become ready.
$ kubectl get deployments --namespace vvp-target-testing
NAME                                                  READY UP-TO-DATE AVAILABLE   AGE
job-f54a8d3f-1daf-49da-8657-4d2203003653-taskmanager  1/1   1          1           113s
Once the deployment is running, the Flink UI link (6) will become active. Please note, though, that since we have not configured metrics or logging their respective links will remain inactive
You can explore the UI a bit further, look into the job being created, and explore further options you can set for each deployment like Flink configuration parameters or enabling SSL communication with a simple push of a button. In the current state, though, you cannot take any savepoints. You will get the following exception and we will fix that below:
BadRequest Job is not configured with savepoint support. Please set the 'state.savepoints.dir' key at flinkConfiguration of the deployment, or the deployment target.
Integrating Azure Blob Storage
As a native target for checkpoint and savepoint data on Azure, we will show how to integrate Azure Blob Storage into vvP and Flink. You may remember the steps to integrate with a previous version of our platform but we have been working hard to make the integration with different cloud vendors and storage systems seamless. Ververica Platform version 2 added a Universal Blob Storage which acts as a centralized blob storage configuration for artifact management, checkpoints, savepoints, and high availability data. Azure Blob Storage is supported in vvP for artifact management as well as Flink storage with Flink versions 1.9 and up.
Let us create the blob storage first, set up credentials, and then see how to integrate it into vvP:
$ az storage account create \
    --name vvpstorage27785 \
    --resource-group vvp-test-group \
    --location northeurope \
    --sku Standard_LRS \
    --kind StorageV2 \
    --encryption-services blob file
$ az storage account keys list \
    --account-name vvpstorage27785 \
    --resource-group vvp-test-group \
    --output table
$ export AZURE_STORAGE_ACCOUNT="vvpstorage27785"
$ export AZURE_STORAGE_KEY="" # from key1 or key2 of the key table

$ az storage container create --name vvp
For integrating this blob storage into vvP, we have to first create a secret for the connection string:
$ kubectl create secret generic vvp-wasbs-secret \
    --namespace vvp \
    --from-literal="azure.connectionString=DefaultEndpointsProtocol=https;AccountName=$AZURE_STORAGE_ACCOUNT;AccountKey=$AZURE_STORAGE_KEY;EndpointSuffix=core.windows.net"
Afterwards, we can configure blob storage in our values.yaml file:
##
## Ververica Platform application configuration
##
vvp:
  blobStorage:
    baseUri: "wasbs://vvp@vvpstorage27785.blob.core.windows.net/"

##
## Blob storage credentials
##
blobStorageCredentials:
  existingSecret: "vvp-wasbs-secret"

##
## Kubernetes RBAC configuration
##
rbac:
  ## Additional namespaces that the created ServiceAccount can access.
  additionalNamespaces:
  - vvp-target-testing"
Finally, we upgrade the helm installation so that these changes are applied:
$ helm upgrade vvp ververica-platform-2.0.2.tgz \
    --namespace vvp \
    --values values.yaml
$ helm list --namespace vvp         # shows a new REVISION
$ kubectl get pods --namespace vvp  # vvp-ververica-platform-* pod is restarted
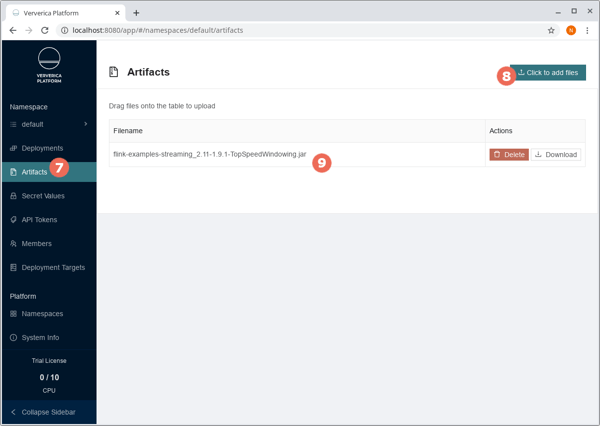
Restart the port-forward, refresh your browser window (!), and cancel the running TopSpeedWindowing deployment. Instead of relying on the artifact to be available via Maven Central, it would be nice to have it in Azure Blob Storage for better availability or—in production setups—to deploy private Flink jobs. For this, please download the flink-examples-streaming_2.11-1.9.1-TopSpeedWindowing.jar file. Then, browse to the Artifacts management (7) and upload this file (8). You should see it in the list of available files (9) as well as in Azure Blob Storage.
$ az storage blob list --container-name vvp --output table
Name                                                                                    Blob Type    Blob Tier    Length    Content Type              Last Modified              Snapshot
--------------------------------------------------------------------------------------  -----------  -----------  --------  ------------------------  -------------------------  ----------
artifacts/namespaces/default/flink-examples-streaming_2.11-1.9.1-TopSpeedWindowing.jar  BlockBlob    Hot          11961     application/octet-stream  2020-01-06T10:31:24+00:00
If you now click into your TopSpeedWindowing deployment, then “Configure Deployment”, and clear the Jar URI field, you will see a (filterable) drop-down list of all available artifacts. Choosing the uploaded flink-examples-streaming_2.11-1.9.1-TopSpeedWindowing.jar file will complete the Jar URI field to the full wasbs:// URI pointing to Azure Blob Storage.
Choose this jar file, apply the changes to the deployment, and start it again (3)!
You will now be able to take savepoints (10) since vvP will configure state.checkpoints.dir, state.savepoints.dir, and high-availability.storageDir accordingly. If you click into the Savepoints tab (11), you will see the list of past snapshots (savepoints but also checkpoints if available and using restore strategy LATEST_STATE). Each snapshot offers a set of actions (13) like resetting a deployment to it (available once the deployment is not running anymore) or forking off a new deployment which is very useful for A/B testing and other experiments.
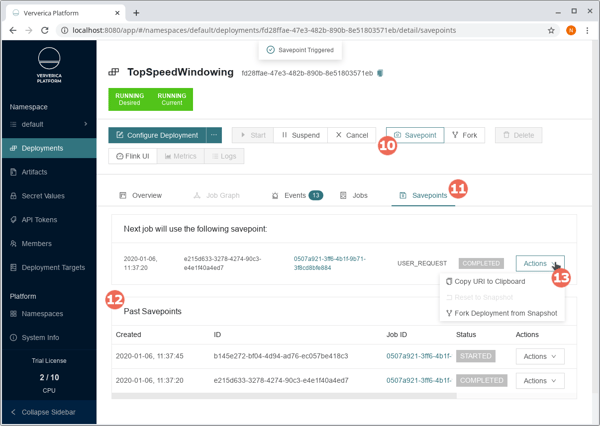
If you call az storage blob list --container-name vvp --output table again, you will now also see additional blobs for these snapshots.
Set up Authentication
Authentication for Ververica Platform works by connecting it to an external identity provider via OpenID Connect (OIDC) since vvP does not actively manage user records. With Azure, we can use Azure Active Directory (v1.0) or the newer Microsoft identity platform (v2.0). The differences mainly affect the default set of claims in the exchanged tokens. For both, you need to register an app as your identity provider. During the registration, enter a name and the supported account types of your choice. The redirect URI will be used after the login at your identity provider to issue a redirect back to vvP. Since we will be using our port-forward from above, enter the following as a redirect URI:
http://localhost:8080/login/oauth2/code/vvp
In order to integrate with this app, you need to retrieve the following information from Azure:
-
from the overview of the app registration that you created above:
-
retrieve the tenant ID from the field “Directory (tenant) ID”
-
retrieve the client ID from the field “Application (client) ID”
-
-
create a client secret for this app
Now change the vvp.auth section of your values.yaml file to the following content using Microsoft identity platform (v2.0) after replacing CLIENT_ID, CLIENT_SECRET, and TENANT_ID with this information.
vvp:
  auth:
    enabled: true
    admins:
    - user:nico@ververica.com
    oidc:
      registrationId: vvp
      registration:
        clientId: <CLIENT_ID>
        clientSecret: <CLIENT_SECRET>
        redirectUriTemplate: "{baseUrl}/{action}/oauth2/code/{registrationId}"
        clientAuthenticationMethod: basic
        authorizationGrantType: authorization_code
        scope:
        - openid
        - profile
      provider:
        issuer-uri: https://login.microsoftonline.com/<TENANT_ID>/v2.0
        # make sure, spring-boot does not fetch user info
        # see https://github.com/spring-projects/spring-security/issues/7679
        user-info-uri:
        userNameAttribute: preferred_username
Please note that we used the preferred_username claim as the user’s name attribute. For a production setup, however, you may want to consider a different claim; please refer to Microsoft’s documentation on available claims in ID tokens and select a claim that is always available for each account you want to grant access. This may require specifying additional scopes or optional claims in the app registration.
Please refer to Microsoft’s documentation on configuring groups optional claims in order to have access to group and role information via ID token claims; the groups claim, however, only seems to be available in Azure Active Directory (v1.0).
Enable Authentication
After another helm upgrade with the new values.yaml and a restart of the port-forward, any access to http://localhost:8080 should redirect to Microsoft’s login form and then—after login—direct you back into vvP.
$ helm upgrade vvp ververica-platform-2.0.2.tgz \
    --namespace vvp \
    --values values.yaml
$ helm list --namespace vvp         # shows a new REVISION
$ kubectl get pods --namespace vvp  # vvp-ververica-platform-* pod is restarted
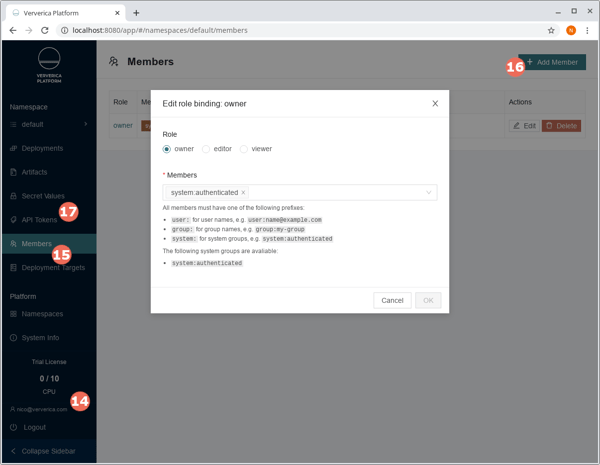
Once logged in, you should see your user name in the navigation bar (14) and can start setting up authorization: (15) lists the members of the current namespace (default) and you can add new members via (16) which will show the form below. In this initial setup, all authenticated users are owners of the default namespace as shown. Calls to the REST API cannot be authenticated via OIDC but are instead authenticated via API tokens (17) which are namespaced and assume a given role following the Google docs model (owner, editor, or viewer). Please refer to our API Token documentation for further details how to create and use them
Wrap-Up
This post addresses some of the updates in setting up Ververica Platform (vvP) 2.0.2 on Microsoft Azure. In the previous sections, we covered how to set up an AKS Cluster with vvP, use the Web UI of vvP, and deploy your first Flink application in a few easy steps. Additionally, we discussed how to integrate Azure Blob Storage into your application and how to set up authentication using Azure Active Directory (v1.0) and Microsoft identity platform (v2.0).

You may also like

Meet the Flink Forward Program Committee: A Q&A with Lorenzo Affetti
Meet Lorenzo Affetti, a Program Committee member for Flink Forward 2025, ...

Outrun Fraudsters with Agentic AI and Ververica
Enhance fraud detection with agentic AI and Ververica's real-time stream ...

KartShoppe: Real-Time Feature Engineering With Ververica
Discover how KartShoppe leverages Ververica’s real-time feature engineeri...
Maximize Efficiency: How Ververica's BYOC Deployment Optimizes CAPEX and OPEX
Learn how Ververica's BYOC deployment leverages CAPEX and OPEX to optimiz...


